Cloud Native OCI
Streaming service
 +
+
Created with ❤ by Oracle A-Team
Table of Contents
Oracle Streaming Service
- What is OSS?
- Use cases
- Concepts
- How it works
- Limits
What is OSS? ![]()

- The OCI Streaming Service provides a fully managed, scalable, and durable storage solution for ingesting continuous, high-volume streams of data that you can consume and process in real time
- OSS is a distributed event-log
- Messages are written to partitions and can be referenced via partition/offset
Use cases
- Metric and log ingestion
- Messaging
- Web/Mobile activity data ingestion
- Infrastructure and apps event processing
- Oracle Data Cloud
Concepts
Stream: a partitioned, append-only log of messages
Message: base64-encoded record that is published to the stream
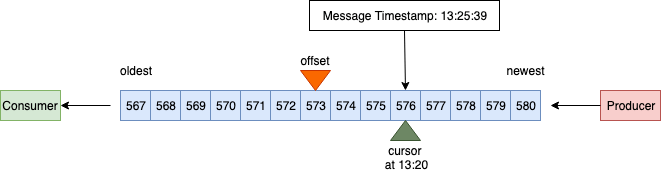
Offset: the location of a message within a partition.
Producer: an entity that writes/publishes messages to a stream.
Consumer: an entity that reads messages from one or more streams.
Partition: a section of a stream. It allows you to distribute a stream by splitting messages across multiple nodes. Each partition can be placed on a separate machine to allow for multiple consumers to read from a stream in parallel.
Cursor: a pointer to a location (offset or time) in a stream.
Concepts
Cursor Type: AT_OFFSET
Consume at a specified offset.

Concepts
Cursor Type: AFTER_OFFSET
Consume after the given offset.

Concepts
Cursor Type: TRIM_HORIZON
Consume from the oldest available message.

Concepts
Cursor Type: AT_TIME
Consume after given time. Timestamp of the message ≥ supplied time.
Concepts
Cursor Type: LATEST
Consume messages published after the cursor creation.

Service Limits
- Message retention: up to 7 days
- Throughput: 1 MB/sec per partition
- Message size: 1 MB maximum
- API calls per second: 5 getMessages per partition
- Max Total Data Write per second: 1 MB per partition
- Number of partitions: Enterprise: 5, Non-Enterprise: 0
Connecting to OSS
Connecting from K8s

# Source: mushop/charts/events/templates/events-deployment.yaml
env:
  # API credentials
  - name: TENANCY
    valueFrom:
      secretKeyRef:
        name: oci-credentials
        key: tenancy
  - name: REGION
    valueFrom:
      secretKeyRef:
        name: oci-credentials
        key: region
        optional: true
  - name: USER_ID
    valueFrom:
      secretKeyRef:
        name: oci-credentials
        key: user
  - name: PRIVATE_KEY
    valueFrom:
      secretKeyRef:
        name: oci-credentials
        key: privatekey
  - name: FINGERPRINT
    valueFrom:
      secretKeyRef:
        name: oci-credentials
        key: fingerprint
  - name: PASSPHRASE
    valueFrom:
      secretKeyRef:
        name: oci-credentials
        key: passphrase
        optional: true
  # Stream connection
  - name: STREAM_ID
    valueFrom:
      secretKeyRef:
        name: oss-connection
        key: streamId
  - name: MESSAGES_ENDPOINT
    valueFrom:
      secretKeyRef:
        name: oss-connection
        key: messageEndpoint
        optional: true
Connecting to OSS
- Configuration
- Auth/Client
- Producer
- Consumer
-
In Java get credentials/IDs from environment:
final String tenantId = env.getProperty("OCI_TENANT_ID"); final String userId = env.getProperty("OCI_USER_ID"); final String fingerprint = env.getProperty("OCI_FINGERPRINT"); final String privateKey = env.getProperty("OCI_API_KEY"); final String passPhrase = env.getProperty("OCI_PASS_PHRASE"); final String region = env.getProperty("OCI_REGION"); final String compartmentId = env.getProperty("OCI_COMPARTMENT_ID"); final String streamId = env.getProperty("STREAM_ID"); -
Create auth provider and stream client objects:
AuthenticationDetailsProvider provider = SimpleAuthenticationDetailsProvider.builder() .tenantId(tenantId) .userId(userId) .fingerprint(fingerprint) .privateKeySupplier(new StringPrivateKeySupplier(privateKey)) .region(Region.fromRegionId(region)) .build(); final StreamAdminClient adminClient = new StreamAdminClient(provider); Stream stream = getStream(adminClient, compartmentId, streamName, partitions); streamClient = new StreamClient(provider); streamClient.setEndpoint(stream.getMessagesEndpoint()); -
Publishing messages to OSS:
PutMessagesDetails messagesDetails = PutMessagesDetails.builder()
  .messages(messages)
  .build();
PutMessagesRequest putRequest = PutMessagesRequest.builder() .streamId(streamsConfig.getStreamId()) .putMessagesDetails(messagesDetails) .build();PutMessagesResponse putResponse = streamsConfig.getStreamClient() .putMessages(putRequest); -
Consuming messages in the Stream:1. Create a cursor:
CreateCursorDetails cursorDetails =
  CreateCursorDetails.builder()
  .partition(partition)
  .type(Type.Latest)
  //.type(Type.TrimHorizon)
  //.type(Type.AtOffset)
  .build();

CreateCursorRequest createCursorRequest =
  CreateCursorRequest.builder()
  .streamId(streamId)
  .createCursorDetails(cursorDetails)
  .build();

CreateCursorResponse cursorResponse =
  streamClient.createCursor(createCursorRequest);
  return cursorResponse.getCursor().getValue();
2. Get messages:for (;;) { GetMessagesRequest getRequest = GetMessagesRequest.builder() .streamId(streamId) .cursor(cursor) .limit(10) .build(); GetMessagesResponse getResponse = streamClient.getMessages(getRequest); //Extract Json message from getResponse //Print message }
Mushop Use Case
 API
API
 Events
 OSS
OSS
 Bucket
Hands-on with OSS
- Create Stream
- Configure
- Deploy
- Verify
-
In order to connect the demo application to the OCI Streaming service,
you first need a provisioned stream.
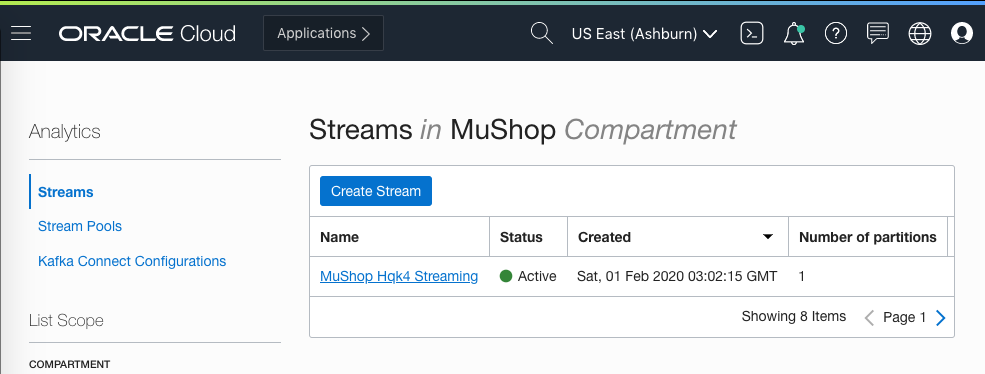
- Launch OCI Console
- Solutions and Platform » Analytics » Streaming
- Choose a Compartment and click
- Enter a name like
mushop-stream, leaving other values as their defaults - Click
-
✏️ Make note of the following items:
- Stream
OCID - Stream
Name
- Stream
-
Configure OSS connection information to be used within the cluster by creating
secrets, and setting values for the helm chart
-
Create a secret called
oci-credentialswith API credentials to connect services from within the cluster:kubectl create secret generic oci-credentials \ --from-literal=tenancy='<TENANCY_OCID>' \ --from-literal=user='<USER_OCID>' \ --from-literal=region='<USER_OCI_REGION>' \ --from-literal=fingerprint='<PUBLIC_API_KEY_FINGERPRINT>' \ --from-literal=passphrase='<PRIVATE_API_KEY_PASSPHRASE>' \ --from-file=privatekey='<PATH_OF_PRIVATE_API_KEY>' -
Create an
oss-connectionsecret:kubectl create secret generic oss-connection \ --from-literal=streamId='<STREAM_OCID>' \ --from-literal=messageEndpoint='<MESSAGE_ENDPOINT_URL>' -
If not done already, download or copy an example values file into your workspace:
(from download)
mv ~/Downloads/myvalues.yaml ./myvalues.yaml- OR -(copy from sample)cp mushop/values-dev.yaml ./myvalues.yaml -
Then configure
myvalues.yaml:# Global service configurations global: ociAuthSecret: oci-credentials # OCI authentication credentials secret name ossStreamSecret: oss-connection # OCI Streaming secret name #...
-
Create a secret called
-
With the values configured, the application is ready to deploy
Remove a previous deployment (if applicable):
Install from thehelm del mushopdeploy/complete/helm-cartdirectory:helm install mushop mushop/ \ -f myvalues.yamlkubectl get pod --watch -
Verify the streaming flow by sending a test message to the events tracking
service
To tail the application logs first you need to find theeventspod name:kubectl get po>Terminal 1: Taileventslogs:
(name will vary)kubectl logs -f --tail 10 mushop-events-gx8wj>Terminal 2: Expose theeventsservice:kubectl port-forward svc/mushop-events 8000:80>Terminal 3: Send a test message to the tracking microservice:curl -X POST \ http://localhost:8000/events \ -H 'Content-Type: application/json' \ -d '{ "source": "test", "track": "abc1234", "events": [{ "type": "any", "detail": "hello" }] }'👀 Watch the terminals and observe messages being produced by
eventsYou should also look at the OCI console. Refresh the table and watch your message being published to the stream.
Streaming Console
Click here to access the OCI console.