Cloud Native OCI
💻 Workshop Preparation
 +
+
Created with ❤ by Oracle A-Team
Prerequisites
The following applications are required for the workshop. Please 🙏 ensure access and/or installation of recent versions ahead of time
| Name | Description | Required? | |
|---|---|---|---|
| OCI Tenancy | ℹ️ | Access to Oracle Cloud Infrastructure console and resources | ✅1 |
| Docker | ℹ️ | Docker engine including Kubernetes and kubectl |
✅ |
| Helm | ℹ️ | Kubernetes Package Manager | ✅ |
| OCI Command Line | Oracle Cloud Infrastructure command line interface | ✅2 | |
| svcat | ℹ️ | Kubernetes Service Catalog CLI | |
| JSON CLI Processor | Command line utility for parsing JSON outputs | ||
| PowerShell or cmder | Windows command line shell | ✅3 | |
1Tenancy access may or may not be provided. Plan to use your own.
2OCI command line is required if using an OKE cluster.
3Required for Windows users.
Configure Tenancy
When a tenancy is created, an Administrators group is automatically created for the tenancy. Users that are members of the default Administrators group can perform any operation on resources in the tenancy.
- Compartment
- API User
- User Policies
- Service Limits
- ✅ Checklist
-
Depending on the tenancy and your level of access,
you may want (or need) to create a compartment
dedicated to this application and the resources allocated.
ℹ️ Documentation
- Launch OCI Console
- Governance and Admininstration » Identity » Compartments »
- ✏️ Make note of the Compartment
OCID
-
You will need a User with API Key access in your tenancy. This can be your personal user account, or
a virtual user specific to usage of this application.
- Open OCI Console
- Governance and Admininstration » Identity » Users
- Select or create the user you wish to use
- If necessary, follow these instructions to create an API key
-
✏️ Make note of the following items:
- User
OCID - API Key Fingerprint
- User
-
If your configured User (with API Key) is not a member
of the Administrators Group, then a Group with specific Policies must be
created, and the User added as a member
- Open OCI Console
- Governance and Admininstration » Identity » Groups »
- Specify metadata for the Group, and make note of the
- Click the button and select your API User
- Governance and Admininstration » Identity » Policies »
-
Create a Policy with the following statement:
Allow group <GroupName> to manage all-resources in compartment <CompartmentName>
⚠️ This policy is intentionally broad for the sake of simplicity, and is not recommended in most real-world use cases. Refer to the Documentation for more on this topic.
-
Use of Cloud Native services in OCI will be subject to Service Limits in your
tenancy. Please check minimum resource availability as follows:
- Open OCI Console Limits
- Governance and Admininstration » Governance » Limits, Quotas, and Usage
- Check Limits
Service Description Requirement Database Autonomous Transaction Processing OCPU Count >=1Streaming Partition Count >=1
⚠️ Default is 0 for Trial Tenanciesℹ️ This does not include requirements in cases where OKE is used. If using an OKE cluster, please refer to OKE Instructions
-
Many of these configurations will be used at different times
within the material that follows. Create a file with the following
information to simplify lookups later.
region:       # Region where resources will be provisioned. (ex: us-phoenix-1)
tenancy:      # Tenancy OCID value
user:         # API User OCID value
compartment:  # Compartment OCID value
key:          # Private API Key file path (ex: /Users/jdoe/.oci/oci_key.pem)
fingerprint:  # Public API Key fingerprint (ex: 43:65:2c...)
ℹ️ It is also recommeded to configure the OCI Command Line with using these values. Refer the Documentation on CLI configuration .
Setup Docker/K8s
Several exercises in the workshop require the use of Docker & Kubernetes. Please follow these instructions to setup your environment.
- Install Docker
- Enable K8s (Mac)
- Enable K8s (Windows)
kubectl
-
Depending on operating system, Docker may be installed in a number of ways,
with the simplest option being
Docker Desktop.
⚠️ Docker Desktop for Windows requires
Hyper-Vsupport. There are several options available, please choose accordingly.Windows users must select the option for Linux containers.
- Docker Desktop for Windows (Windows 10 Pro with Hyper-V)
- Docker Toolbox (Windows without Hyper-V)
- Docker + Minikube (Windows without Hyper-V)
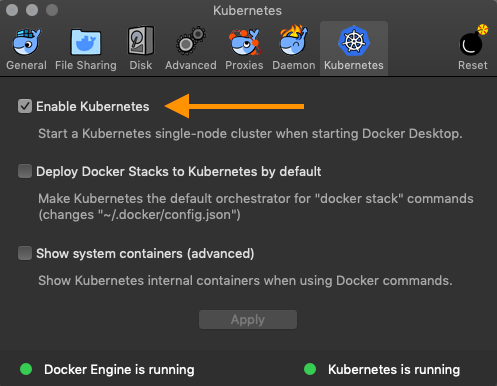
-
Docker » Preferences
ℹ️ This also installs the
kubectlCLI![Enable K8S]()
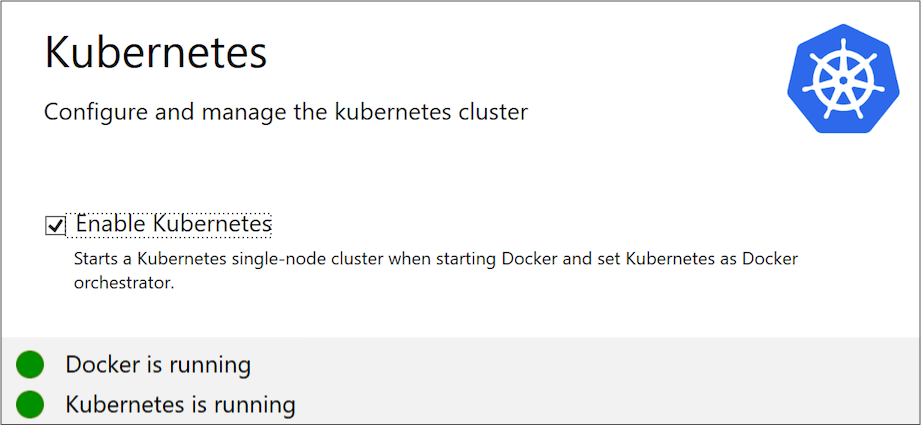
-
Installing Docker and running a local Kubernetes cluster on a Windows machine
will depend on the operating system, and features available - namely
Hyper-Vℹ️ If using a local K8s cluster presents an inconvenience, it is recommended to setup an OKE cluster instead. In this situation, a local installation of the Kubernetes command line:
kubectlis also necessary.![Enable K8S]()
-
-
⚠️ Verify
kubectlis installed -
Check
kubectlcontextkubectl config current-context -
Set the default
kubectlnamespace to skip adding--namespace <name>to every command:TIP: use kubens to switch namespace easily & often from the command line
Use "mushop":kubectl create namespace mushopkubectl config set-context \ --current --namespace=mushopORUse "your name":kubectl create namespace <your_name>kubectl config set-context \ --current --namespace=<your_name>
-
⚠️ Verify
Prepare OKE Cluster
As an alternative to a local Kubernetes cluster, you may wish to utilize an OKE cluster. Please follow these instructions to setup an OKE cluster.
- OKE IAM Policies
- Create Cluster
- Configure
kubectl - K8s Dashboard
-
Before you can use Container Engine for Kubernetes (OKE) to manage clusters,
the tenancy's root compartment must include a
policy to allow OKE to perform necessary operations.
ℹ️ Documentation
- Open OCI Console
- Governance and Admininstration » Identity » Policies » Create
- Click the button
-
Create a Policy with the following Statement:
Allow service OKE to manage all-resources in tenancy
-
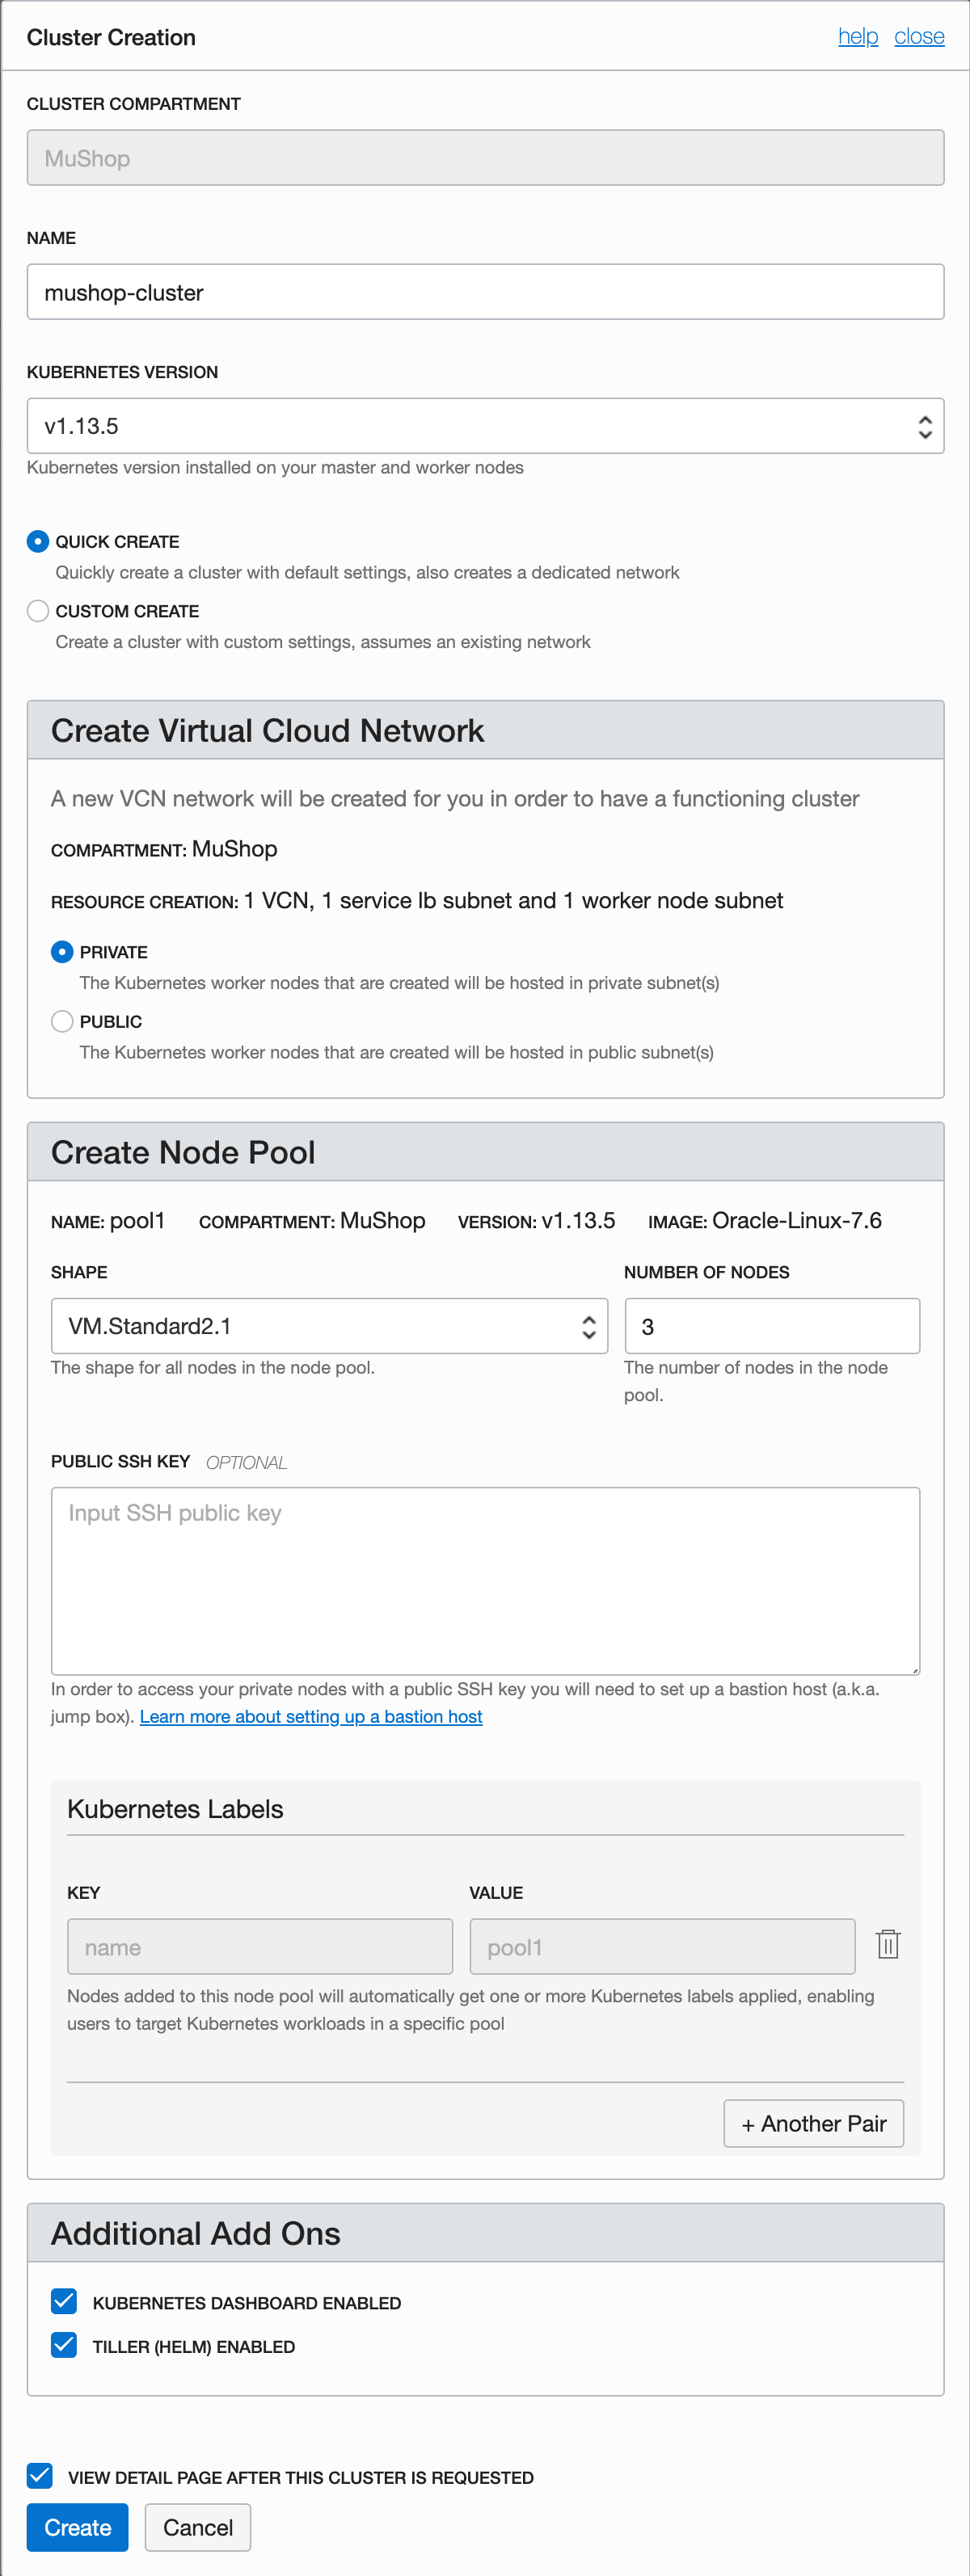
Developer Services » Container Clusters (OKE) »
![Console - Cluster Creation]()
-
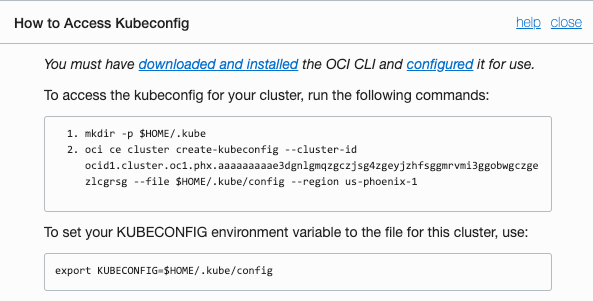
Configure
kubectlcommand line tool with![Console - Accessing Kubeconfig]()
mkdir -p $HOME/.kubeoci ce cluster create-kubeconfig --cluster-id ocid1.cluster.oc1.phx.aaaaaaaaae3dgnlgmqzgczjsg4zgeyjzhfsggmrvmi3ggobwgczgezlcgrsg --file $HOME/.kube/config --region us-phoenix-1export KUBECONFIG=$HOME/.kube/config -
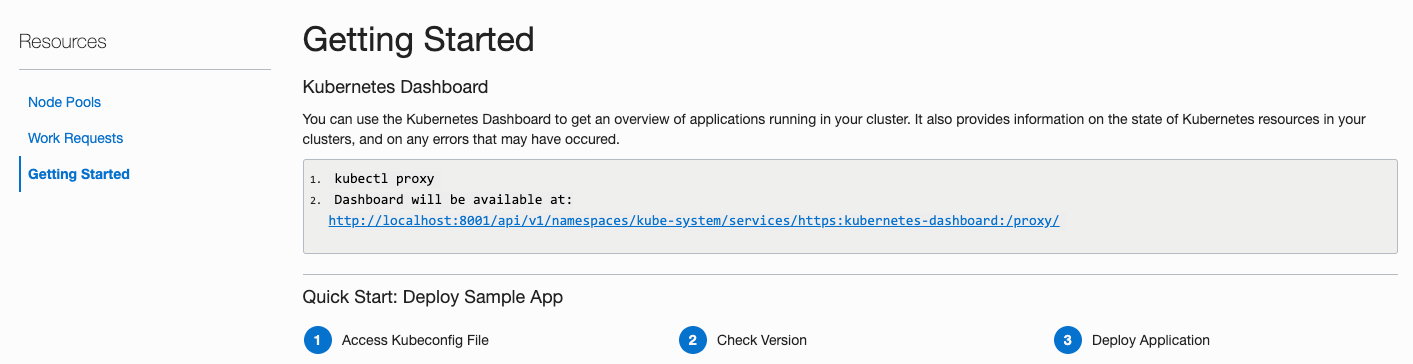
Access the Kubernetes Dashboard UI
![Console - Accessing Kubernetes Dashboard]()
kubectl proxyOpen http://localhost:8001/api/v1/namespaces/kube-system/services/https:kubernetes-dashboard:/proxy/
Helm/svcat Installation
- MacOS
- Windows
- Windows (svcat)
- Linux
-
Install Homebrew, a MacOS package manager, if not yet installed
/usr/bin/ruby -e "$(curl -fsSL https://raw.githubusercontent.com/Homebrew/install/master/install)"Install Helm using this command. Will also install the optional svcat cli
brew update && brew install kubernetes-helm kubernetes-service-catalog-clientCheck if you have helm installed on the local K8s (Docker Desktop)
helm versionThe Helm version command should give result similar to this:
> helm version
Client: &version.Version{SemVer:"v2.14.3", GitCommit:"0e7f3b6637f7af8fcfddb3d2941fcc7cbebb0085", GitTreeState:"clean"}
Server: &version.Version{SemVer:"v2.14.3", GitCommit:"0e7f3b6637f7af8fcfddb3d2941fcc7cbebb0085", GitTreeState:"clean"}
If you receive an error that helm could not find tiller pod on the server, do this:
helm init --history-max 200 -
Install Chocolatey, a Windows package manager, if not yet installed
Install Helm using this command
choco install kubernetes-helmCheck if you have helm installed on the local K8s (Docker Desktop)
helm versionThe Helm version command should give result similar to this:
c:\ helm version
Client: &version.Version{SemVer:"v2.14.3", GitCommit:"0e7f3b6637f7af8fcfddb3d2941fcc7cbebb0085", GitTreeState:"clean"}
Server: &version.Version{SemVer:"v2.14.3", GitCommit:"0e7f3b6637f7af8fcfddb3d2941fcc7cbebb0085", GitTreeState:"clean"}
If you receive an error that helm could not find tiller pod on the server, do this:
helm init --history-max 200 -
Install the svcat cli:
iwr 'https://download.svcat.sh/cli/latest/windows/amd64/svcat.exe' -UseBasicParsing -OutFile svcat.exe
mkdir -f ~\bin
$env:PATH += ";${pwd}\bin"
svcat version --client
Or download the binary directly and make executable: svcat.exe download
- See linuxbrew and follow directions as in MacOS